
gable box printing
Showing the single result
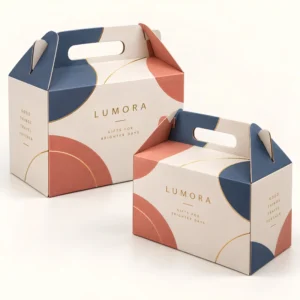
Gable box printing turns a plain handled carton into branded packaging that carries your logo, colours and message on every panel. The peaked top and wide side panels give you generous space for artwork, while the handle keeps the box practical for takeaway food, gifts and retail sets. This guide explains how gable box printing works, what artwork you need, and which choices affect the final look.
How gable box printing works on each panel
A gable box has four main side panels, plus the peaked top panels that form the handle. When the box is flat, those panels sit side by side as a single printed sheet, which means your design can flow across the box or stay contained on one panel. Many brands put the logo and product name on the largest front panel, a short message or pattern on the sides, and care or ingredient information on the back. That layout helps a customer recognise the brand at a glance, even when the box is carried at an angle.
Printing is usually applied before the box is cut and folded, so the artwork must line up with the folds and the handle cut outs. A small shift in artwork can move a logo close to a fold, which is why a proof matters so much. The proof shows the flat artwork with fold lines marked, so you can check that text stays clear of creases and that important details are not hidden inside the handle section. Take time at this stage, because changes after production are difficult and expensive.
Full colour, spot colour and simple artwork
Full colour printing suits photographs, illustrations and designs with many colours or soft gradients. It gives a bakery, a gift brand or a retailer the freedom to use a rich image across the whole box. Spot colour printing suits a logo or a design built from one or a few exact colours, and it can give a cleaner, more consistent result for a simple brand mark. If your design is mainly text and a logo, a limited colour approach can look sharp and professional, and it keeps the artwork easier to manage.
Colour on board looks different from colour on a screen. Kraft board adds warmth to printed colours, while white board keeps colours brighter and closer to the digital file. If colour accuracy matters for your brand, discuss a printed sample or a colour reference with your supplier before a large run. Lighting also affects how a box looks in a shop, so view a sample under the kind of light your customers will see it in.
Artwork files and proof checks
Supply artwork as a clear, high resolution file, with text converted to outlines or supplied with the correct fonts, and with any images at a size that will not look soft when printed. Check the proof for spelling, allergen wording, contact details and legal information, and read it aloud if that helps you catch errors. Confirm that the logo is not stretched, that small text is still readable, and that no wording sits too close to a fold or a cut edge. Approve the proof only when every detail is correct.
Finishes that change the look of printed gable boxes
A matt finish gives a soft, understated surface that suits artisan food, natural cosmetics and elegant gifts. A gloss finish adds shine and makes colours look vivid, which can suit party products, seasonal ranges and bold retail designs. Foil can add a metallic accent to a logo or a headline, while embossing raises a detail so it can be felt as well as seen. Each finish changes the cost and the production time, so choose the finish that supports your product rather than adding every option at once.
Finish also affects handling. A coated surface can resist scuffs during packing and transport, which helps printed boxes stay presentable in a busy shop. An uncoated surface can feel more natural and may suit a brand that values a simple, tactile look. If your boxes will be handled many times, or stacked in a display, ask how the finish will hold up in everyday use.
Planning gable box printing for food, gifts and events
For food, printed panels must leave room for the information customers need. The name of the food, ingredients and allergen details should be legible, and the food labelling and packaging guidance explains what food businesses must show. If the printed design is busy, keep the labelling panel calm and clear, with good contrast between text and background. A beautiful box that hides allergen information is not a successful design.
For gifts and events, printing can carry a name, a date, a short message or a pattern that matches the occasion. Wedding favours, birthday treats, corporate gifts and seasonal sets all benefit from a design that feels made for that moment. Keep the main message short, so it can be read quickly, and let one strong element lead the design rather than crowding every panel with text.
Common printing mistakes to avoid
The most common mistake is placing text too close to a fold, a handle cut out or an edge, where it can be creased or trimmed. Another is using an image that looks fine on a phone screen but becomes soft or pixelated at print size. A third is approving a proof in a hurry, then noticing a spelling error or an old address after delivery. A careful proof check, a printed sample where possible, and a second pair of eyes on the text will prevent most of these problems.
Also avoid overloading the box. A logo, a product name, a short line of information and one visual element are usually enough. White space, or plain board, helps the eye rest and makes the important details stand out. If you need more information, consider an insert card inside the box, which can carry a longer message without cluttering the printed panels.
Ordering printed gable boxes in practice
Prepare a brief that includes the box size, board choice, print coverage, finish and quantity, plus your artwork and any text for the labelling panel. Share the exact wording you want printed, rather than asking a supplier to guess at product details. Standard lead time after final artwork approval is 10 to 14 working days, while corrugated options are 12 to 15 working days. These are guide times for planning, not a guaranteed delivery date.
Related gable box options
Printed boxes work well alongside other handled options. Compare gable boxes for the general range, gable box packaging for material and use advice, and gable box sizes to match artwork to dimensions. When your brief is ready, use get a quote and attach your artwork notes.
Shipping gable box printing
Print on a gable box has to survive shipping as well as look good when it is handed over in a shop. Gloss and foil finishes can scuff if boxes rub together in a shipping carton, so pack printed gable boxes with tissue or a divider between them, keep the printed panels away from tape, and place the finished box inside an outer shipping carton when it must travel by courier. Check a shipped sample on arrival, because a design that looks perfect on a proof can lose its impact if the shipping carton has crushed a corner or rubbed a printed panel.
Frequently asked questions about gable box printing
What is gable box printing?
Gable box printing is the process of printing a logo, artwork or product information onto the panels of a handled gable box, usually before the box is cut and folded.
Can I print on all sides of a gable box?
Yes, the main side panels and the peaked top panels can all carry print, but artwork must stay clear of folds and handle cut outs. A proof will show where each element will sit.
What artwork file should I supply?
Supply a clear, high resolution file with text prepared for print and images large enough to stay sharp at the final size. Check the proof for spelling and colour before you approve it.
Does printing work on kraft board?
Yes, printing works on kraft board, but colours will look warmer than on white board. View a sample if exact colour matching matters for your brand.
How long does gable box printing take?
Standard lead time after final artwork approval is 10 to 14 working days as a guide. Corrugated options are 12 to 15 working days, and complex finishes may need extra planning time.