
custom mailer box printing
Showing all 2 results
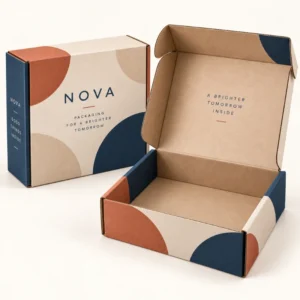
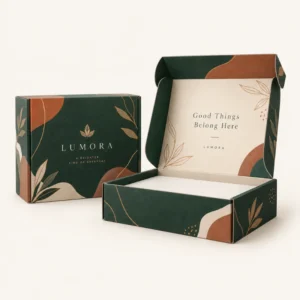
Custom mailer box printing is the process of printing your artwork, logo and messages directly onto a mailer box, inside and outside, so the box itself becomes part of your brand. Good printing turns a plain postal box into a recognisable parcel that customers notice, photograph and remember. The result from custom mailer box printing depends on artwork quality, print method, board choice and proofing, so each stage deserves attention before production begins.
How custom mailer box printing works
Printing starts with artwork supplied as a print ready file, usually in a vector or high resolution format, with colours set for print rather than for screen. The artwork is laid out on a box template, known as a dieline, which shows fold lines, lid areas, glue areas and safe zones where text and logos will not be lost on a fold. Checking artwork against the dieline is essential, because a logo placed too close to a fold can be distorted, and text placed in a glue area can be hidden entirely.
Once artwork is approved, the box board is printed, cut, creased and folded into its finished shape. The print method chosen affects colour accuracy, detail, quantity suitability and cost structure, which is why the same artwork can look slightly different depending on method and board. A proof, whether digital or physical, is the best way to confirm colour, position and legibility before a full run, especially for a first order or a new design.
Print methods: digital, litho and flexo
Digital printing suits smaller runs, fast turnaround and designs with many colours or variable elements, such as different messages for different products. It prints directly from a digital file, so setup is simpler and short runs are practical. Colour can be very good, but it may differ slightly from a spot colour printed by litho, so brands with a strict brand colour should check a proof carefully.
Litho printing, also called offset printing, suits larger runs and designs where colour consistency and fine detail matter most. Artwork is printed onto a sheet which is then mounted to board, giving a smooth, high quality result that suits premium mailer boxes and detailed illustration. Flexo printing suits high volume corrugated boxes with simpler artwork, such as a logo and handling marks in one or two colours. It is efficient for large quantities, but it is less suited to very fine detail or photographic images.
Choosing a method for your quantity and design
Choose digital for a small or test run, for frequent design changes or for full colour artwork at modest quantities. Choose litho for a large run where colour consistency and premium finish justify the setup. Choose flexo for very large runs with bold, simple artwork. If you are between methods, share your quantity, artwork complexity and brand colour requirements when requesting a quote, so the method can be matched to the job rather than chosen by habit.
Colour, artwork and finishes in custom mailer box printing
Colour in print is described in two main ways. Full colour, often called CMYK, uses four inks to reproduce a wide range of colours, including photography and gradients. Spot colour uses a specific premixed ink for a precise brand colour, which can be more consistent across runs. Many mailer boxes use full colour for illustration and a spot colour for a logo, but the combination should be planned with the printer, because it affects method and proofing.
Artwork quality determines print sharpness more than any other factor. Logos should be supplied as vector files where possible, so they can be scaled without losing sharpness. Photographs and illustrations should be high resolution at the printed size, not enlarged from a small web image. Text should be large enough to read after folding, and small text should be checked on a proof at actual size, because a line that looks clear on screen can become faint on board.
Inside print, outside print and print placement
Outside print is seen during delivery and on the doorstep, so it should prioritise brand recognition and handling information. A logo, brand name and any essential handling marks should be clear and well positioned, away from the address label area where possible. Inside print is revealed on opening, so it can carry a thank you message, a pattern, care instructions or a brand story. The inside lid is often the most photographed panel, so artwork there should be checked with extra care.
Finishes that protect print and add character
Finishes affect both appearance and durability. Matte lamination gives a soft feel and reduces glare, gloss lamination brightens colours and helps resist scuffing, and soft touch lamination gives a velvety feel for premium ranges. Foil can highlight a logo or a short phrase in metallic colour. Spot UV can add shine to selected areas, such as a logo, against a matte background. Embossing raises an area for texture. Each finish should be tested for transit durability, because a finish that scuffs easily will make even excellent print look tired on arrival.
Proofing, board choice and ordering custom mailer box printing
Board choice affects print as much as method does. White board gives the brightest colours and the cleanest whites, because print sits on a light base. Kraft board gives a natural, warm base that can mute bright colours and change how they appear, which can be beautiful for earthy brands but surprising if it is not expected. A proof on the actual board is the most reliable way to judge colour, especially for kraft. Ask how colours will appear on your chosen board before approving artwork.
Proofing should check more than colour. Check logo position on every panel, check that text does not cross a fold, check inside lid alignment and check that handling marks are legible. Fold a physical proof if one is available, pack a product in it and open it as a customer would. That physical check often reveals issues that a flat digital proof cannot show, such as print that is lost inside a tuck or a message that is upside down when the lid is opened.
To order, share the box size and style, quantity, board preference, artwork files and finish requirements. For the box itself, see custom mailer box for presentation led orders and for a complete pack, see custom mailer box packaging for a complete pack. After final artwork approval, standard lead times are 10 to 14 working days, corrugated boxes are 12 to 15 working days and rigid or specialist boxes are 13 to 16 working days. These are production lead times, not a guaranteed delivery date. Delivery details are on the delivery information page. Request a tailored quote through the get a quote form and browse the full shop range.
Artwork checklist before you send files
Before sending artwork, confirm file format, resolution, colour mode, bleed and safe zones, and whether fonts are outlined or supplied. Include a reference image showing how the finished box should look, because that helps the printer spot a layout error that a file alone cannot reveal. Note any brand colours that must match exactly, and any text that must not be changed, such as legal information or care instructions.
Avoiding the most common print errors
Common errors include low resolution images, logos placed over fold lines, text too small to read, colours chosen on screen without a proof and artwork that does not allow for lid overlap. Each error is preventable with a dieline check and a proof review. Take time at this stage, because print errors are visible on every box in the run, not only on a single sample.
Frequently asked questions
What is the difference between digital and litho printing?
Digital printing suits smaller runs and frequent design changes, with simpler setup. Litho printing suits larger runs where colour consistency and fine detail matter most, and it is often used for premium mailer boxes.
Can I print in full colour on kraft board?
Yes, but colours will appear warmer and less bright than on white board, because kraft provides a brown base. Check a proof on kraft before approving artwork, especially for bright colours and light text.
Should I print inside the box as well?
Inside print is recommended when the opening experience matters, because it rewards the customer for opening the box. A message, pattern or brand colour on the inside lid is often photographed and shared.
How long does production take?
After final artwork approval, standard lead times are 10 to 14 working days, corrugated boxes are 12 to 15 working days and rigid or specialist boxes are 13 to 16 working days. These are production lead times, not a guaranteed delivery date.
What artwork file should I supply?
Supply a print ready file, preferably vector artwork for logos and high resolution artwork for images, with colours set for print. Include a reference image of the intended finished box to help check layout.