
custom mailer box inserts
Showing all 2 results
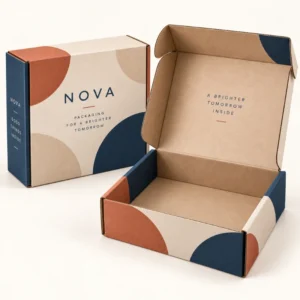

Custom mailer box inserts are fitted pieces placed inside a mailer box to hold each product in place, protect it in transit and present it neatly on opening. Without an insert, products can slide, knock together or arrive at an angle that looks careless. With well cut custom mailer box inserts, each item has a home, the box opens to a clear layout and the customer sees care in the details before touching the product.
Why custom mailer box inserts matter for protection
Protection is the first job of an insert. A box alone can only limit movement by its outer size. An insert limits movement in each direction, so a bottle cannot roll, a jar cannot tip and two items cannot collide. That control matters most for glass, ceramics, liquids and products with lids, caps or delicate surfaces. It also matters for sets, where one loose item can damage every other item in the same box.
Inserts also reduce the need for loose void fill. Loose fill can look messy, can shift in transit and can be frustrating to unpack. A fitted insert replaces that loose material with a structured layout that is quick to pack and quick to unpack. Packing staff place each item in its cut out or compartment, close the lid and know the pack is complete. Customers lift each item out in order, without digging through fill.
Insert materials and when to use each one
Card and corrugated inserts suit most mailer boxes. They are light, printable, easy to recycle with the box and strong enough for many retail products. A card divider separates items, a corrugated nest cradles a round product and a multi compartment tray organises a set. Card inserts can be printed with a logo, a message or a simple pattern, so they contribute to branding as well as protection.
Foam inserts suit delicate, high value or irregularly shaped products that need soft, close fitting support. Foam can be cut to the exact profile of a product, which gives excellent protection against knocks. Moulded pulp inserts suit eco focused brands and products that need a firm, shaped cradle, such as bottles and jars. Pulp is made from recycled fibre and can be composted or recycled in many areas, but its shape options and finish differ from card and foam, so it should be chosen for fit first and for sustainability second.
Matching material to product weight and fragility
Light, sturdy products often need only a card divider or a simple tray. Medium weight products, such as filled jars and bottles, benefit from a corrugated nest or a pulp cradle that supports the base and the sides. Fragile or high value products benefit from foam or a deeper card structure that protects corners and necks. Very heavy products need an insert that spreads load across the base of the box, rather than concentrating it on one point that could puncture the board.
Designing custom mailer box inserts for a perfect fit
Good insert design starts with accurate product measurements and a clear picture of how items will be arranged. Measure length, width, height and diameter where relevant, and note any protruding caps, handles or labels that change the profile. Decide whether products will lie flat, stand upright or sit at an angle, and whether they should be visible immediately on opening or revealed in layers. A sketch of the layout, even a simple one, helps avoid an insert that fits the box but not the products.
Cut outs should be snug but not tight. A product that must be forced into a cut out can be damaged on packing or on removal, and a product that sits too loosely will still move. Allow a small tolerance for variation in handmade products, such as candles and ceramics, where dimensions can vary slightly from batch to batch. Test the insert with products from different batches, not only with a single perfect sample, before confirming a full run.
Compartments, layers and multi item sets
Multi item sets benefit from compartments that keep each product separate and visible. A two compartment insert suits a pair of products, while a layered insert suits a set that should be revealed in stages, such as a top layer for a main product and a lower layer for samples or accessories. Dividers that fold up from the base can be more economical than separate trays, but they must be tall enough to stop items crossing over each other during transit.
Designing for easy packing and easy opening
An insert that is slow to assemble will slow every order. Folding inserts should fold intuitively, with clear creases and no force needed. Products should lift out easily, with finger cut outs where a snug fit would otherwise make removal awkward. Test packing with staff who have not designed the insert, because they will reveal steps that are confusing or fragile. A design that only its creator can pack quickly is not ready for production.
Print, branding and ordering custom mailer box inserts
Inserts can be plain or printed. Plain kraft or white card gives a clean, understated interior that lets the product stand out. Printed inserts can carry a logo, a short message, usage instructions or a pattern that ties the inside of the box to the outside branding. Print is most effective when it is simple and well placed, such as a logo on a divider that is visible on opening, rather than dense text that is hidden once products are in place.
To order, share the mailer box internal dimensions, product dimensions and weights, the number of items per box and any print requirements. If the box already exists, its internal size is essential, because an insert that is even a few millimetres too large will buckle, and one that is too small will slide. For the box itself, see custom mailer box for presentation led orders and for a complete pack, see custom mailer box packaging for a complete pack.
After final artwork approval, standard lead times are 10 to 14 working days, corrugated boxes are 12 to 15 working days and rigid or specialist boxes are 13 to 16 working days. These are production lead times, not a guaranteed delivery date. Insert lead time should be planned alongside the box, so both arrive together and packing is not delayed. To discuss a fitted insert, use the get a quote form and browse the full shop range.
Testing inserts before a full run
Test an insert by packing the real products, closing the box, shaking it gently and turning it over. Open it and check whether products have moved, whether any item has marked another and whether the insert itself has bent or torn. Repeat the test after the box has been stored flat and refolded, because an insert that works once in a studio may behave differently after storage and handling in a busy packing area.
Common insert mistakes to avoid
Common mistakes include measuring the outer box instead of the internal space, forgetting lid thickness, designing a cut out for a product without its cap and choosing foam where card would protect just as well and recycle more easily. Each mistake is easy to avoid with a physical test pack and a checklist that includes product, cap, label and any sleeve or pouch that will be part of the final parcel.
Frequently asked questions
Do I need custom inserts or will dividers be enough?
Dividers are enough when products are sturdy, similar in size and unlikely to damage each other. Custom cut inserts are better for fragile, round, heavy or high value products, and for sets where presentation and separation both matter.
What material is best for glass bottles?
Card nests and moulded pulp cradles both work well for bottles, because they support the base and sides and stop rolling. Foam gives the closest fit for very delicate or irregular bottles. The choice depends on weight, fragility and recycling priorities.
Can inserts be printed?
Yes. Card inserts can be printed with a logo, a message or a pattern. Keep print simple and place it where it will be seen on opening, rather than where it will be hidden under products.
How do I measure for an insert?
Measure the internal dimensions of the mailer box and the full dimensions of each product, including caps and handles. Share both sets of measurements, plus the layout you want, when requesting a quote.
How long does production take?
After final artwork approval, standard lead times are 10 to 14 working days, corrugated boxes are 12 to 15 working days and rigid or specialist boxes are 13 to 16 working days. These are production lead times, not a guaranteed delivery date.