
order custom shipping boxes
Showing the single result
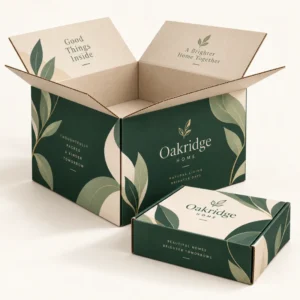
To order custom shipping boxes, you choose a box style and size that fits your products, supply your branding and artwork, approve a proof, and then have the boxes produced and delivered flat for packing. The process is straightforward when you start with real product measurements and a clear idea of how the box will be used, because those two details decide the board, the closure and the print area. A well planned first order saves time, avoids reprints and gives you packaging that protects your products and presents your brand well from the first delivery.
How to order custom shipping boxes without delays
Delays usually come from missing information rather than from production itself. Before you place an order, gather the internal dimensions you need, the weight of a typical packed parcel, the number of boxes you expect to use, and any special requirements such as a fitted insert, a tear strip or a particular finish. If you are replacing an existing box, measure that box inside, not just outside, and note what worked and what did not. A box that was slightly too large, a closure that was awkward to seal, or a print area that was too small are all useful details to share at the start.
Artwork is the other common cause of delay. Supply your logo and design in a high resolution format, with fonts and colours specified, and check spelling, contact details and any legal information before you submit it. If your artwork needs to be adapted to a box template, allow time for that adaptation and for a proof check. A careful proof stage may feel slow, but it is far quicker than correcting a full printed run after delivery.
Step by step ordering process
First, define the product or products the box must hold, and measure the largest and heaviest combination you expect to ship. Second, choose a style: a mailer box with a self locking closure suits many ecommerce orders, a regular shipping carton suits heavier or bulkier parcels, and a rigid box suits premium or gift ranges. Third, choose a board and a finish that match the weight and the brand look you want. Fourth, confirm the quantity and the print area, and supply your artwork. Fifth, approve the proof, checking colours, text and placement. Finally, confirm delivery details and storage, so the flat boxes arrive somewhere dry and accessible for packing.
Keeping a simple specification sheet for your box helps if you reorder later or if different staff place orders. Record the box style, internal size, board, print colours, finish and any insert details in one place, so a reorder matches the original exactly without a new round of decisions.
What to check on the proof
Check the spelling of every word, the accuracy of any address or website details, and the placement of your logo relative to folds and tape areas. Check colours on screen and, if possible, on a printed sample, because colours can look different on different screens. Check that any handling message, such as a note to keep the parcel upright, is clear and in a sensible position. Once you approve the proof, production is based on that approved version, so take the time to review it properly.
Choosing size, board and print when you order custom shipping boxes
Size should be based on your products, not on a standard size that happens to be available. A box that is too large wastes void fill and increases postage size, while a box that is too tight risks damage and makes packing slower. Measure length, width and height, add space for protection, and use those internal measurements as your starting point. If you ship several product combinations, choose a size that suits the most common order, and use inserts or void fill for smaller orders, rather than holding a large range of box sizes that complicate packing.
Board choice follows weight and fragility. Single walled corrugated board suits light to medium orders, double walled board suits heavier or more fragile contents, and a heavier flute can add crush resistance for parcels that will be stacked. Kraft board gives a natural look, white board gives brighter print, and a coated board can improve print detail. Print options range from a simple logo on the outside to full colour print inside and outside, with finishes such as matt lamination, gloss lamination, spot UV and foil for a more premium effect. Keep the design clear and readable, especially on the outside, where the brand name and any handling guidance need to be seen quickly.
Quantities, storage and cost planning
Quantity affects both unit cost and storage. Ordering too few boxes may mean a shortfall during a busy period, while ordering too many may mean stock is damaged, becomes outdated if branding changes, or takes up valuable storage space. Look at your recent order volumes, allow for growth and seasonal peaks, and choose a quantity that covers a sensible period, often a few months, rather than a full year for a first order. Flat supplied boxes stack well, but they still need a dry, level storage area where they will not be crushed or exposed to damp.
Planning for seasonal peaks and launches
Seasonal peaks and product launches are the times when packaging shortages cause the most disruption. Place orders for those periods earlier than you think you need to, and keep a small reserve of your standard box for unexpected demand. If a launch involves a new product size, test the box with the real product before the launch date, so any fit or protection issue can be corrected while there is still time.
Lead times and next steps
Standard lead times after final artwork approval are 10 to 14 working days, while corrugated boxes are 12 to 15 working days and rigid or specialist boxes are 13 to 16 working days. These are guide times for planning, not a guaranteed delivery date, so build them into your launch or restock schedule and allow extra time if your artwork needs significant adaptation. Once you have approved the proof and confirmed the order, you can plan packing, labelling and dispatch around the expected delivery window.
If you are ready to start, gather your product measurements and artwork, then use the quote route to discuss size, board, print and quantity with the team. You can explore the shop range, learn more on the about us page, check the delivery information page, or request a quote to order custom shipping boxes for your business.
Frequently asked questions
What information do I need to order custom shipping boxes?
You need product measurements, a typical packed weight, the box style and quantity you want, and your artwork with colours and text specified. Real measurements and a clear product description help avoid delays and reprints.
How long does production take after I approve the proof?
Standard lead times after final artwork approval are 10 to 14 working days, while corrugated boxes are 12 to 15 working days and rigid or specialist boxes are 13 to 16 working days. These are guide times, not a guaranteed delivery date.
Can I print inside and outside a shipping box?
Yes, many shipping boxes can be printed inside, outside or on both sides. Outside print carries your brand on arrival, while inside print creates a reveal when the customer opens the parcel.
Should I order a small quantity for my first custom box?
A smaller first order is often sensible, because it lets you test fit, protection and customer response with real orders before committing to a larger quantity. You can then reorder the same specification once you are confident in the size and design.