
mailer box dieline
Showing the single result
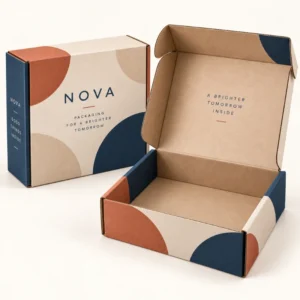
A mailer box dieline is the technical drawing that defines the exact flat shape of a mailer box, showing where the board will be cut and where it will be folded. It is the blueprint that turns a design idea into a box that assembles correctly and prints in the right places. Without an accurate mailer box dieline, even beautiful artwork can end up misaligned, trimmed at the wrong edge, or folded across a logo or important text.
What a mailer box dieline shows
A dieline shows the box unfolded, with solid lines for cuts and dashed or scored lines for folds, although the exact line styles vary by supplier and software. Each panel is drawn to scale for a specific box size, so the base, lid, front, back and side flaps all appear in their correct proportions. Glue areas, tuck flaps and thumb notches may also be marked, where they form part of the structure. Reading a dieline therefore requires thinking in two dimensions at once: the flat sheet in front of you, and the three dimensional box it will become.
The dieline also defines the relationship between artwork and structure. Background colour must extend to the bleed line beyond the cut, while text and logos must stay inside the safe area away from cuts and folds. When a designer understands this relationship, they can place artwork with confidence, knowing that a logo on the lid will sit centrally on the finished box, and that a pattern will flow sensibly across panels rather than breaking at an awkward fold.
How dielines differ by box size and board
Every box size needs its own dieline, because changing length, width or depth changes every panel and flap. A dieline for a small mailer cannot simply be enlarged for a larger mailer, because flap lengths, fold positions and glue areas do not scale in a simple way. Board thickness also matters: thicker board needs slightly different allowances at folds, so the supplier should confirm the final dieline for the board that will actually be used. Using a dieline for the wrong size or board is one of the most common causes of boxes that do not close neatly.
Cut lines, fold lines and glue areas
Cut lines show where the board will be trimmed to create the flat shape. Fold lines, also called score lines, show where the board will bend to form the box. Glue areas show where adhesive will join panels during manufacture, and artwork should avoid placing essential text over these areas, since they may be hidden inside the finished box. Keeping the dieline on a separate layer in design software makes it easy to distinguish these guides from artwork, and to hide them before export.
How a mailer box dieline is used in production
In production, the dieline guides the cutting die, which is the tool that cuts and scores the board into the flat shape. Artwork is printed on the board, either before or after cutting depending on the production method, and the printed sheets are then folded and glued into finished boxes. If the dieline and artwork are not aligned, print can shift relative to folds, so a logo that looked central on screen may sit off centre on the finished box. This is why suppliers ask designers to work on the approved dieline, rather than creating their own layout from scratch.
Proofing is the stage where dieline accuracy is checked. A flat proof shows artwork against the dieline, while a folded sample or digital mockup shows how the box will look when assembled. Both are useful: the flat proof reveals alignment and bleed issues, while the assembled sample reveals problems with flap positions, lid fit and pattern flow. Checking both before approval gives the best chance of a finished box that matches the design intent.
Common dieline errors and how to prevent them
Common errors include using a dieline for the wrong size, placing text across a fold, forgetting bleed, and exporting the dieline itself as part of the print file. Each of these can be prevented by a simple routine: confirm size and board first, keep the dieline on its own layer, keep text inside safe areas, extend backgrounds to bleed, and hide the dieline layer before export. A final check against the supplier approved dieline, rather than a downloaded generic template, is the most reliable safeguard.
Working with a supplier on dieline approval
When you work with a supplier, ask for the dieline that matches your exact specification, and confirm any changes in writing if size or board changes. Share your artwork on that dieline, and ask for a proof that shows artwork and dieline together, plus an assembled view if possible. If anything looks unclear, such as a flap position or a glue area, ask before approving, because corrections after approval can delay production and add cost. Clear communication at dieline stage makes the rest of production much smoother.
From mailer box dieline to finished order
A practical workflow starts with agreeing the box size, structure and board, then obtaining the matching dieline. Artwork is placed on the dieline, a proof is reviewed, corrections are made, and only then is the artwork approved for production. After final artwork approval, standard lead times are 10 to 14 working days, and corrugated lead times are 12 to 15 working days. Treat those windows as production guides rather than guaranteed delivery dates, and plan photography and launch dates around them.
Keep the approved dieline and final artwork together for reorders, with notes on size, board, finish and print colours. If you change size for a new product, request a new dieline rather than adapting the old one, because panel and flap dimensions will change. A well organised dieline library saves time on future orders and reduces the risk of artwork errors when a design is reused for a different box.
Browse the shop for packaging options to compare mailer styles, and look at custom mailer boxes for branded orders and printed mailer boxes for print ideas. For a tailored specification, use the get a quote form for custom packaging and include product size, quantity and artwork details.
Frequently asked questions
What is a mailer box dieline?
A mailer box dieline is a technical drawing showing the flat shape of a mailer box, with cut lines, fold lines and panel positions. It guides both artwork placement and manufacture, so the finished box assembles and prints correctly.
Do I need a different dieline for each box size?
Yes. Each size and structure has its own panel dimensions and fold positions, so a dieline for one size should not be reused for another. Always use the dieline that matches the exact box being ordered.
Should the dieline be visible on the printed box?
No. The dieline is a guide only and should be hidden before artwork is exported for print. Only the artwork should appear on the finished box.
What is the difference between a dieline and a template?
A dieline is the technical cut and fold drawing, while a template usually combines the dieline with guides for bleed, safe areas and artwork placement. In practice, designers often work with a template built around the dieline.
How do I check a dieline before approving artwork?
Check that the dieline matches your agreed size and board, that text stays inside safe areas, that backgrounds reach bleed, and that the dieline layer is separate from artwork. Review a flat proof and an assembled sample where possible.