
mailer box design template
Showing the single result
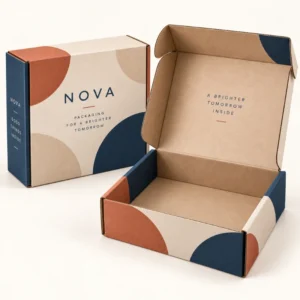
A mailer box design template is a layout file that shows the flat shape of a mailer box, with marked areas for cutting, folding, printing and safe artwork placement. It allows a designer to place a logo, pattern, text and colour on the correct panels before the box is manufactured. Using a mailer box design template reduces the risk of artwork being cut off, folded awkwardly or printed in the wrong position, and it makes approval much easier for both the brand and the supplier.
What a mailer box design template contains
A typical template shows the box unfolded, with each panel labelled by its position: base, lid, front, back and side flaps. Lines on the template show where the board will be cut and where it will be folded, so the designer can see how the flat sheet becomes a finished box. Additional guides show the bleed area, where background colour should extend beyond the cut edge, and the safe area, where text and logos should stay to avoid being trimmed or creased. Keeping these guides in mind from the start saves time, because artwork placed without them often needs to be reworked.
Templates are usually supplied for a specific box size and structure, because a change in length, width or depth changes every panel. A template for one mailer size should not be reused for a different size, even if the design looks similar, because panels, flaps and fold positions will differ. If you change board thickness, the template may also need adjustment, so confirm the final template with the supplier before placing final artwork.
Understanding dielines, bleed and safe areas
The dieline is the technical drawing that defines the cut and fold lines of the box. It is the foundation of the template, and artwork should be built on a separate layer above it, so the dieline itself is not printed. Bleed is the extra background colour that extends past the cut line, usually a few millimetres, so that no white edge appears if cutting varies slightly. The safe area is the inner margin where essential text and logos should sit, away from cut lines and folds, so they remain fully visible on the finished box.
Layers, guides and file formats explained
Good templates keep different elements on separate layers: the dieline, the artwork, the guides and any notes. This makes it easy to hide the dieline before export and to check artwork without distraction. Common file formats include vector formats for precise artwork, and PDF for proofing and sharing. Vector artwork is preferred for logos and text, because it remains sharp at any size, while images should be high resolution so they do not blur in print. Always check which formats your supplier accepts before you start.
Using a mailer box design template step by step
Start by confirming the exact box size, structure and board with the supplier, and obtain the matching template. Open the template at actual size, keep the dieline on its own layer, and place your artwork panel by panel, thinking about how each panel will appear on the finished box. The outside lid is usually the most visible surface, so place the main logo or message there, and use the inside lid for a secondary message or pattern. Check that text does not cross a fold line, and that backgrounds extend fully to the bleed edge where colour should reach the cut.
Next, create a mockup by folding a printed test or by using a digital mockup, and view the box from the angles a customer will see: closed on a doorstep, opening on a table, and with the product inside. This step often reveals problems that are invisible on a flat template, such as a logo that sits upside down on a flap, or a pattern that breaks awkwardly at a fold. Correct these issues before sending artwork for a proof, because changes after proof approval can delay production.
Common template mistakes and how to avoid them
One frequent mistake is stretching artwork to fit a template, which distorts logos and type. Another is placing small text too close to a fold, where it can crease and become hard to read. A third is forgetting bleed, which can leave a thin white edge on a coloured box. A fourth is using low resolution images, which look acceptable on screen but blur in print. Working at actual size, keeping the dieline separate, and checking a physical proof all help to avoid these errors.
Checking your template before you send it
Before sending artwork, run through a final check: is the template the correct size and structure, is the dieline on a separate layer, does background colour reach the bleed edge, is all essential text inside the safe area, and are images high resolution. Also check spelling, logo placement and colour values, because a proof will reproduce exactly what you send. A few minutes spent on this check can prevent a costly reprint and a delayed launch.
From mailer box design template to finished printed box
Once artwork is placed on the template, it is usually sent for a proof, which shows how the finished box will look and allows final corrections. Review the proof carefully at actual size where possible, and confirm colours, spelling, placement and size in writing. Only approve when you are fully satisfied, because approval is the point at which production begins. After final artwork approval, standard lead times are 10 to 14 working days, and corrugated lead times are 12 to 15 working days. Treat those windows as production guides rather than guaranteed delivery dates.
Save the final approved template and artwork together, with notes on board, finish, print colours and box size, so reorders can be produced consistently. If you create a seasonal variation, start from the approved template and change only the artwork layer, keeping the structure and guides unchanged. This keeps seasonal designs accurate and avoids the need to rebuild the template from scratch each time.
Browse the shop for packaging options to compare mailer styles, and look at custom mailer boxes for branded orders and printed mailer boxes for print ideas. For a tailored specification, use the get a quote form for custom packaging and include product size, quantity and artwork details.
Frequently asked questions
What is a mailer box design template?
A mailer box design template is a flat layout showing the panels, cut lines, fold lines, bleed and safe areas of a mailer box. It guides artwork placement so logos, text and colour appear correctly on the finished box.
Can I use the same template for different box sizes?
No. Each size and structure has its own panel dimensions, flap positions and fold lines. Always use the template that matches the exact box you are ordering.
What is bleed on a mailer box template?
Bleed is background colour that extends past the cut line, so no white edge shows if cutting varies slightly. Backgrounds that should reach the edge of a panel must extend to the bleed line.
What is a safe area on a mailer box template?
The safe area is the inner margin where text and logos should stay, away from cut lines and folds. Keeping essential elements inside the safe area ensures they remain fully visible and legible.
Should the dieline be printed on the finished box?
No. The dieline is a technical guide only and should be kept on a separate layer that is hidden before artwork is exported for print. Only the artwork layer should appear on the finished box.