
customize mailing boxes
Showing the single result
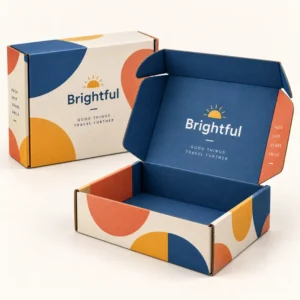
To customize mailing boxes is to adapt a postal box to a specific brand and a specific set of products, choosing its size, board, structure, print and finish instead of accepting a generic box. The result is a parcel that protects its contents, carries the brand clearly and opens in a way that feels intentional. For businesses that post regularly, that combination of protection and presentation can improve customer perception with every delivery.
Customize mailing boxes to fit your products and brand
Customising a mailing box starts with the products, not with the artwork. A box that fits well protects better, needs less filler and looks more professional than a box that is far too large. Measuring products as they will be packed, including any wrapping, inserts or leaflets, gives the internal size that matters. From there, board strength can be chosen for the heaviest likely parcel, and print can be planned for the panels that customers will actually see.
Brand fit is the second part of the decision. A mailing box is often the first physical contact a customer has with a brand, especially for an online only business. Colour, typography, imagery and finish should therefore match the brand as it appears on the website and on the product itself. A mismatch, such as a bright, playful website paired with a plain, unbranded parcel, can make the delivery feel disconnected. A consistent design across website, product and parcel helps the brand feel coherent and trustworthy.
Steps to customize a mailing box
A practical sequence for customising a mailing box begins with confirming products and quantities, then agreeing size and board, then planning print areas and finishes, then checking artwork on a proof and, where possible, on a packed sample. Each step builds on the last, so changes made early are easier than changes made after production. This sequence also helps the quote to reflect the real specification, because size, board and print choices are settled before production is discussed.
Starting from products rather than artwork
Starting from products prevents a common problem: artwork that looks excellent on screen but does not fit the box panels once folds and closures are taken into account. When size and structure are settled first, the designer knows exactly how much space is available on each panel and where folds will fall. That knowledge leads to cleaner layouts, more legible text and fewer proof revisions. It also means the box can be tested with real products before artwork is finalised.
Design choices for posted parcels
Design for a posted parcel must work in conditions that retail packaging never faces. The box may be stacked, dropped, exposed to rain or handled by several people before it reaches the customer. Print should therefore remain clear even if the box is slightly scuffed, and important information should not rely on a single small detail. Strong, simple artwork often survives transit better than fine, delicate detail, and a design that looks good when slightly worn will age better than one that depends on perfection.
Balancing appearance with postal strength
Appearance and strength can work together if board and finish are chosen with transit in mind. A stronger board may give a slightly different print surface, so artwork colours should be checked on the actual board. Lamination can add protection against scuffing and moisture, but it should be chosen with recyclability in mind, and any claims about the final package should reflect the materials, coatings and inserts actually used. Testing a packed sample through a real delivery route is the most reliable way to check this balance.
Materials, structures and finishes
Corrugated board is the usual choice for mailing boxes, because the fluted layer provides cushioning and helps the box resist crushing when stacked. E flute board suits typical online orders and gives a smooth print surface, while B flute board suits heavier or more fragile parcels. Kraft board gives a natural, uncoated appearance that suits artisan brands, while white board gives a bright base for detailed colour work. For very heavy or valuable parcels, double wall board or a printed box inside a protective outer may be more appropriate.
Structure options include a tuck in lid mailer, a mailer with a tear strip for easy opening, a full flap box for extra protection and a crash lock box for fast assembly. Finish options include matte and gloss lamination, soft touch lamination, foil, embossing, debossing and spot gloss. Inside print can add a welcome message or a guide, while inserts and dividers can keep multiple items in order. Each option should be judged by whether it helps the customer or the packing team, not simply by whether it is available.
Choosing a structure for your dispatch process
Dispatch process matters as much as customer experience. A box that takes a long time to assemble will slow down a busy packing area and increase the chance of errors. A crash lock base, a self sealing strip or a simple tuck in lid can each speed up packing in different ways, depending on volume and staffing. Observing the packing team assemble a sample, timed with real products, will show whether a structure is practical at scale, not just attractive as an empty box.
Easy opening for the recipient
Easy opening matters for the recipient, especially for gifts, subscriptions and products that will be opened without tools. A tear strip gives a clear, satisfying opening, while a well designed tuck in lid opens cleanly without tearing the print. The opening should reveal the contents in good order, not spill them, so the internal layout and any inserts should be checked as part of the opening test. A box that opens well is more likely to be photographed, shared and remembered.
Ordering, artwork and lead times
To order a customised mailing box, prepare a brief that covers internal size, products, quantity, board preference, print finish and any inserts or opening features. Include photographs and dimensions for the largest product, and say whether the box will be posted alone or inside an outer. If artwork is ready, send it with the brief so print areas and colours can be checked. If artwork is still in progress, a sketch of the layout and notes about brand colours will still allow a useful discussion.
Artwork checks should cover spelling, brand names, web addresses, inside messages and any care or return information. Text should sit clear of folds, logos should be sharp and colours should be checked on the chosen board. Once final artwork is approved, standard lead times are 10 to 14 working days, while corrugated options are 12 to 15 working days. These are production guides after approval, not a guaranteed delivery date, and the timing for a specific order will be confirmed with the quote. Keeping a record of the full specification makes repeat orders simpler and more consistent.
What to send with a quote request
Send product dimensions as packed, expected quantity, board and finish preferences, and notes about inside print, inserts, tear strips or other features. The more specific the brief, the more accurate the quote and the fewer revisions will be needed. You can request a quote to customize mailing boxes when those details are ready, and you can read delivery information for timing guidance.
Final checks before approving a proof
Final proof checks should include a read through by someone who did not design the artwork, because fresh eyes catch spelling and layout errors more easily. Check the proof at actual size, check colours in daylight, and check a folded sample if the layout wraps around corners or crosses panels. Confirm that the box closes cleanly when full and opens without tearing important print. These checks take minutes and can prevent a full run of boxes that need to be corrected. Related ranges include customised mailer boxes and customizable mailer boxes, and you can browse the wider shop for printed packaging or learn more on the about Personalized Mailer Boxes page.
Frequently asked questions
What does it mean to customize mailing boxes?
It means adapting a postal box to your brand and products, by choosing size, board, structure, print, finish and any inserts, rather than using a generic box with a label added afterwards.
Can I customize a mailing box if I only have a logo?
Yes, a logo is a good starting point. A simple design using your logo, brand colours and a short message can look professional, and fuller artwork can be developed later as the brand grows.
Should mailing boxes be printed inside?
Inside printing is worth considering if the opening experience matters to your brand. A short welcome, a care note or a simple pattern on the inside lid can make a parcel feel complete.
What board should I choose for fragile parcels?
Stronger corrugated board, with dividers or cushioning inserts where needed, usually works best for fragile parcels. The board should be chosen for the heaviest and most fragile likely parcel in that box size.
How long does production take after artwork approval?
Standard lead times after final artwork approval are 10 to 14 working days, while corrugated options are 12 to 15 working days. Confirmed timing will be given with the quote for a specific order.