
custom mailer box template
Showing the single result
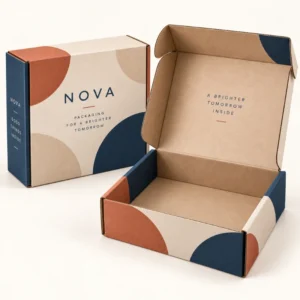
A custom mailer box template is the flat layout that shows exactly where your box folds, prints and closes before it is made. It turns a finished box into a working plan, with panels for the base, lid, sides and flaps marked in their true positions. When you use a custom mailer box template well, your logo, text and pattern land where you intend them to land, instead of disappearing into a fold or sitting too close to an edge.
How a custom mailer box template works
Think of the template as a map of the box before it is folded. The outside panels carry the design that a customer sees on delivery, while the inside panels can carry a welcome message, a pattern or simple instructions. Crease lines show where the board bends, and the safe area shows where important text and logos should stay so they are not trimmed away. A good template also makes the closure clear, so you can see how the lid tucks in and how the side walls support the contents during transit.
The template is most useful when it is matched to one exact box size. A layout drawn for a shallow box will not suit a deep box, because the proportions of the lid and the base change. Measure your product first, add room for any tissue, padding or a card, then choose length, width and depth that give a snug but workable fit. If the box is too tight, packing slows down and corners can strain. If it is too loose, the product moves and the unboxing feels untidy.
What the dieline shows you
The dieline is the technical outline inside the template. It marks cut lines, fold lines and glue areas, and it separates the print area from the parts of the board that will be hidden once the box is assembled. Designers use it to place artwork with precision, and printers use it to check that colours and images extend far enough past the trim edge. That extra bleed area matters, because a small shift during cutting should reveal more of your design, not a strip of bare board.
When you review a dieline, check every panel in turn rather than looking only at the front. The back panel, the side walls and the inside of the lid all have a role, and a message that works on the outside may read awkwardly upside down on the inside. Keep the most important branding on the panels that are seen first, and use the inside for a reward, such as a thank you note, a care tip or a prompt to reuse the box.
Bleed and safe area in plain terms
Bleed means extending background colour or pattern slightly beyond the cut line, so the finished edge looks intentional. The safe area is the inner zone where logos and essential text should sit. Together, these two zones prevent the common faults that make a printed box look rushed, such as clipped lettering, a white sliver at an edge, or a pattern that stops abruptly. Ask for a proof that shows both zones before you approve artwork, and check it at full size rather than only as a small thumbnail.
Preparing artwork for a custom mailer box template
Start with high resolution artwork and a clear hierarchy. One strong logo, one short headline and one call to action usually read better than a crowded panel filled with competing messages. Use colours that suit the board you have chosen, because the same artwork can look softer on natural kraft and brighter on white board. If you use photography, check that faces, products and key details do not cross a fold, where they would bend and lose impact.
File preparation also affects how smoothly production runs. Supply text as outlines or embedded fonts where possible, keep images at a resolution suited to print, and name your files clearly by panel or version. A short note that explains which panel is the lid, which is the base and where the opening sits can prevent a costly misunderstanding. If you are unsure about a file format, describe what you have when you request a quote and the team can advise on the next step.
Common artwork mistakes to avoid
The most frequent mistake is placing a logo or a discount code too close to a fold. The second is using very small text for important information, such as care instructions or a web address, which can become hard to read once printed on board. A third is forgetting the inside of the box entirely, leaving a plain interior that misses a simple chance to surprise the customer. A template review that checks folds, text size and interior panels in one pass will catch all three.
Colour choice deserves the same care. A dark background can look rich on screen but may need a lighter logo to stay legible in real light. A pale design can look clean but may show scuffs more readily during transit. Testing a printed proof, even a simple flat proof, gives you a far better guide than a screen alone, because board texture and print finish change how colour behaves.
Choosing a finish that suits the template
A matte finish gives a soft, understated look and suits brands that favour calm, natural packaging. A gloss finish adds shine and can make photography and bold colour stand out, while a soft touch coating adds a tactile quality that customers notice when they handle the box. Foil and raised gloss effects work best when used sparingly, for a logo or a short word, rather than across a whole panel. Whatever finish you choose, check it on the proof, because finish changes the way the same artwork is perceived.
From template to finished box
Once artwork is approved, the template becomes the production guide. The board is cut and creased to the dieline, printed inside and outside as specified, then folded and glued or supplied flat for assembly, depending on the specification agreed at quote stage. Standard production after final artwork approval is 10 to 14 working days, while corrugated mailer boxes are 12 to 15 working days and rigid or specialist boxes are 13 to 16 working days. These are working day ranges after approval, not a guaranteed delivery date, and the delivery information page explains the process in more detail.
To move from planning to ordering, browse the custom mailer boxes range for related styles, look at the shop for the wider range, and use the get a quote page to share your size, board and artwork details. A clear brief that includes product dimensions, quantity, print coverage and any insert will help the team give you a useful quote without a long exchange of messages.
What to include in your quote brief
Include the internal size you need, the product or products the box will hold, and whether you need print on the outside only or on both sides. State the board finish you prefer, the quantity you have in mind and the date you are working towards, so the team can confirm whether the timeline is realistic. If you already have a template or artwork file, mention its format. If you do not, say so plainly, because starting from your logo and product measurements is a normal route and should not delay your enquiry.
A simple review checklist before approval
Read every word on the proof, including small print, and check spelling in UK English. Confirm that the logo is the current version, that colours match your brand guide, and that no important element sits on a fold. Open the proof as if you were the customer, starting with the outside, then the lid interior, then the base. That order mirrors the real unboxing and often reveals a placement problem that a flat view alone would hide.
Posting and packaging duties
Check the finished parcel against the Royal Mail small parcel guide before you book postage, because size and weight limits affect which service suits the parcel.
Checking duties that may apply to sellers
If you supply packaged goods in volume, read the GOV.UK guidance on extended producer responsibility for packaging to understand whether packaging duties apply to your business. That check is separate from box specification, but it helps you plan responsibly as order volume grows.
Frequently asked questions
What is a custom mailer box template used for?
It is used to plan the size, folds, print and closure of a mailer box before production, so artwork lands in the right place on every panel.
Do I need design software to use a template?
You need a way to place artwork on the layout, but you do not need to build the dieline yourself. Share your logo and measurements when you request a quote and the layout can be checked with you.
What size should my template be?
It should match the internal size of the finished box. Measure your product, add room for any padding or card, then confirm length, width and depth before artwork is finalised.
Can I print on the inside of the box?
Yes, interior print is a common choice for mailer boxes. It works well for a welcome message, a pattern or simple care information.
How long does production take after artwork approval?
Standard production after final artwork approval is 10 to 14 working days, corrugated mailer boxes take 12 to 15 working days, and rigid or specialist boxes take 13 to 16 working days.